Custom Keypoints and OKS Metrics
Design a keypoint schema for non-human objects, write and check its dataset YAML, and set OKS sigmas from how precisely each point can be placed.
Pose is not only for people. Fork tips on a forklift, corners of a parcel label, the nose and tail of an animal — any object with stable, nameable points can be a pose dataset. The schema you write on day one is permanent: every label, every flip pair, and every metric depends on it, and changing it later means relabeling everything. This lesson gets the schema right before anyone labels a thousand images, and shows exactly how the metric will judge it.
Hands-on
Design the keypoint schema#
Good keypoints share three properties: unambiguous (two annotators put the point in the same place), stable (the point exists in every pose the object takes), and useful (some downstream calculation reads it). Take a forklift seen from a ceiling camera, where the product question is "are the forks raised while the truck moves?":
| Index | Keypoint | Why it exists | Mirror partner |
|---|---|---|---|
| 0 | left_fork_tip | fork extent and direction | 1 |
| 1 | right_fork_tip | fork extent and direction | 0 |
| 2 | mast_top | fork height relative to the mast | 2 (itself) |
| 3 | mast_base | reference point on the chassis | 3 (itself) |
Every point earns its place by feeding the calculation: the fork tips give direction, and the mast pair gives height. Run every candidate point through the same filter:
Resist adding points "just in case": each one costs labeling time on every instance, and points nobody reads only add noise to the metric. Public datasets show the range: Tiger-Pose uses 12 points without visibility, Dog-Pose 24, and Hand Keypoints 21:
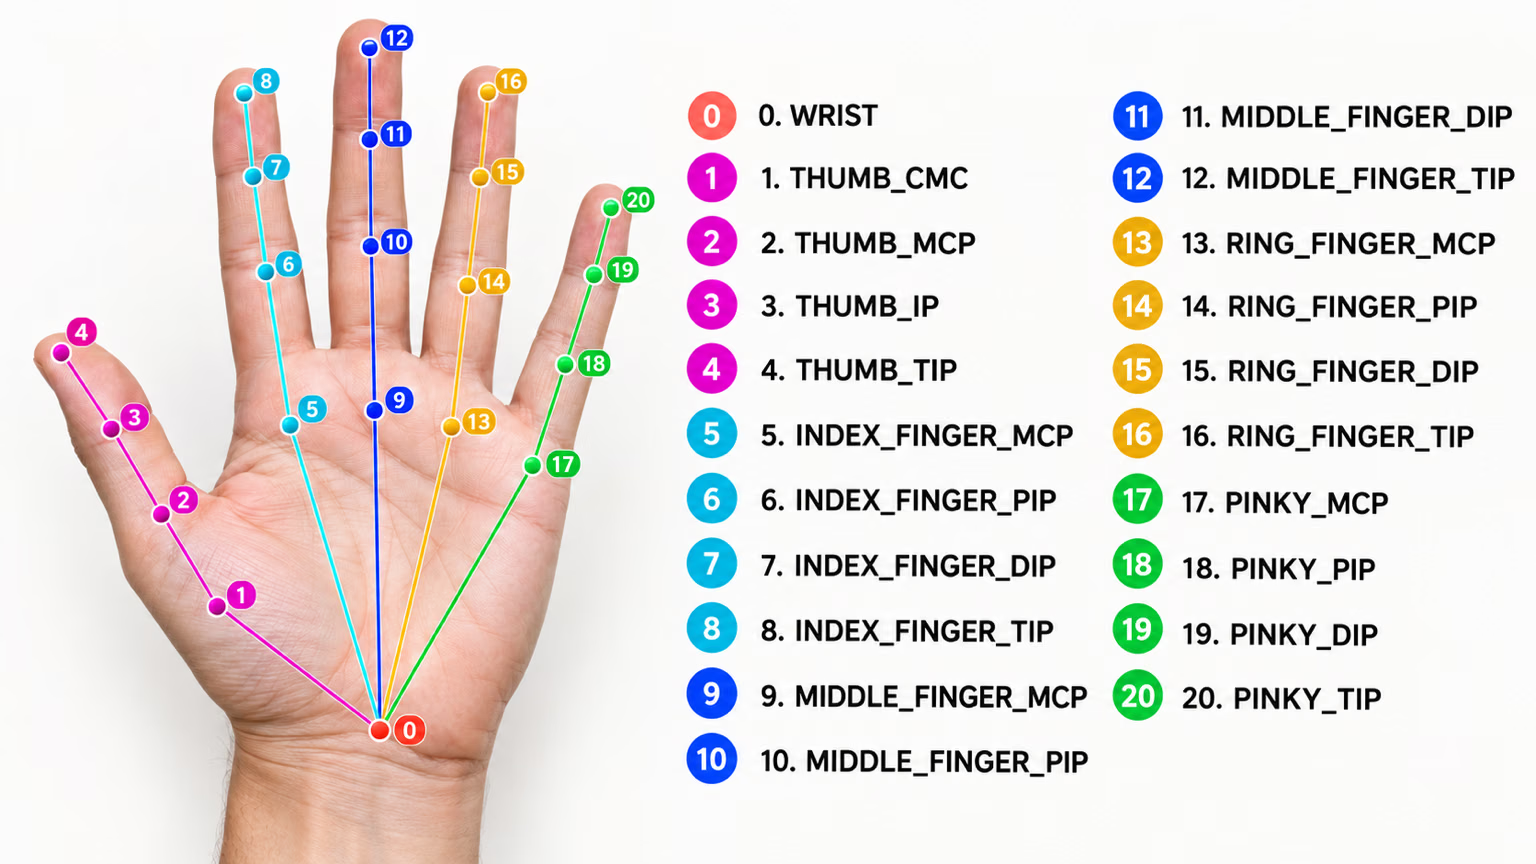
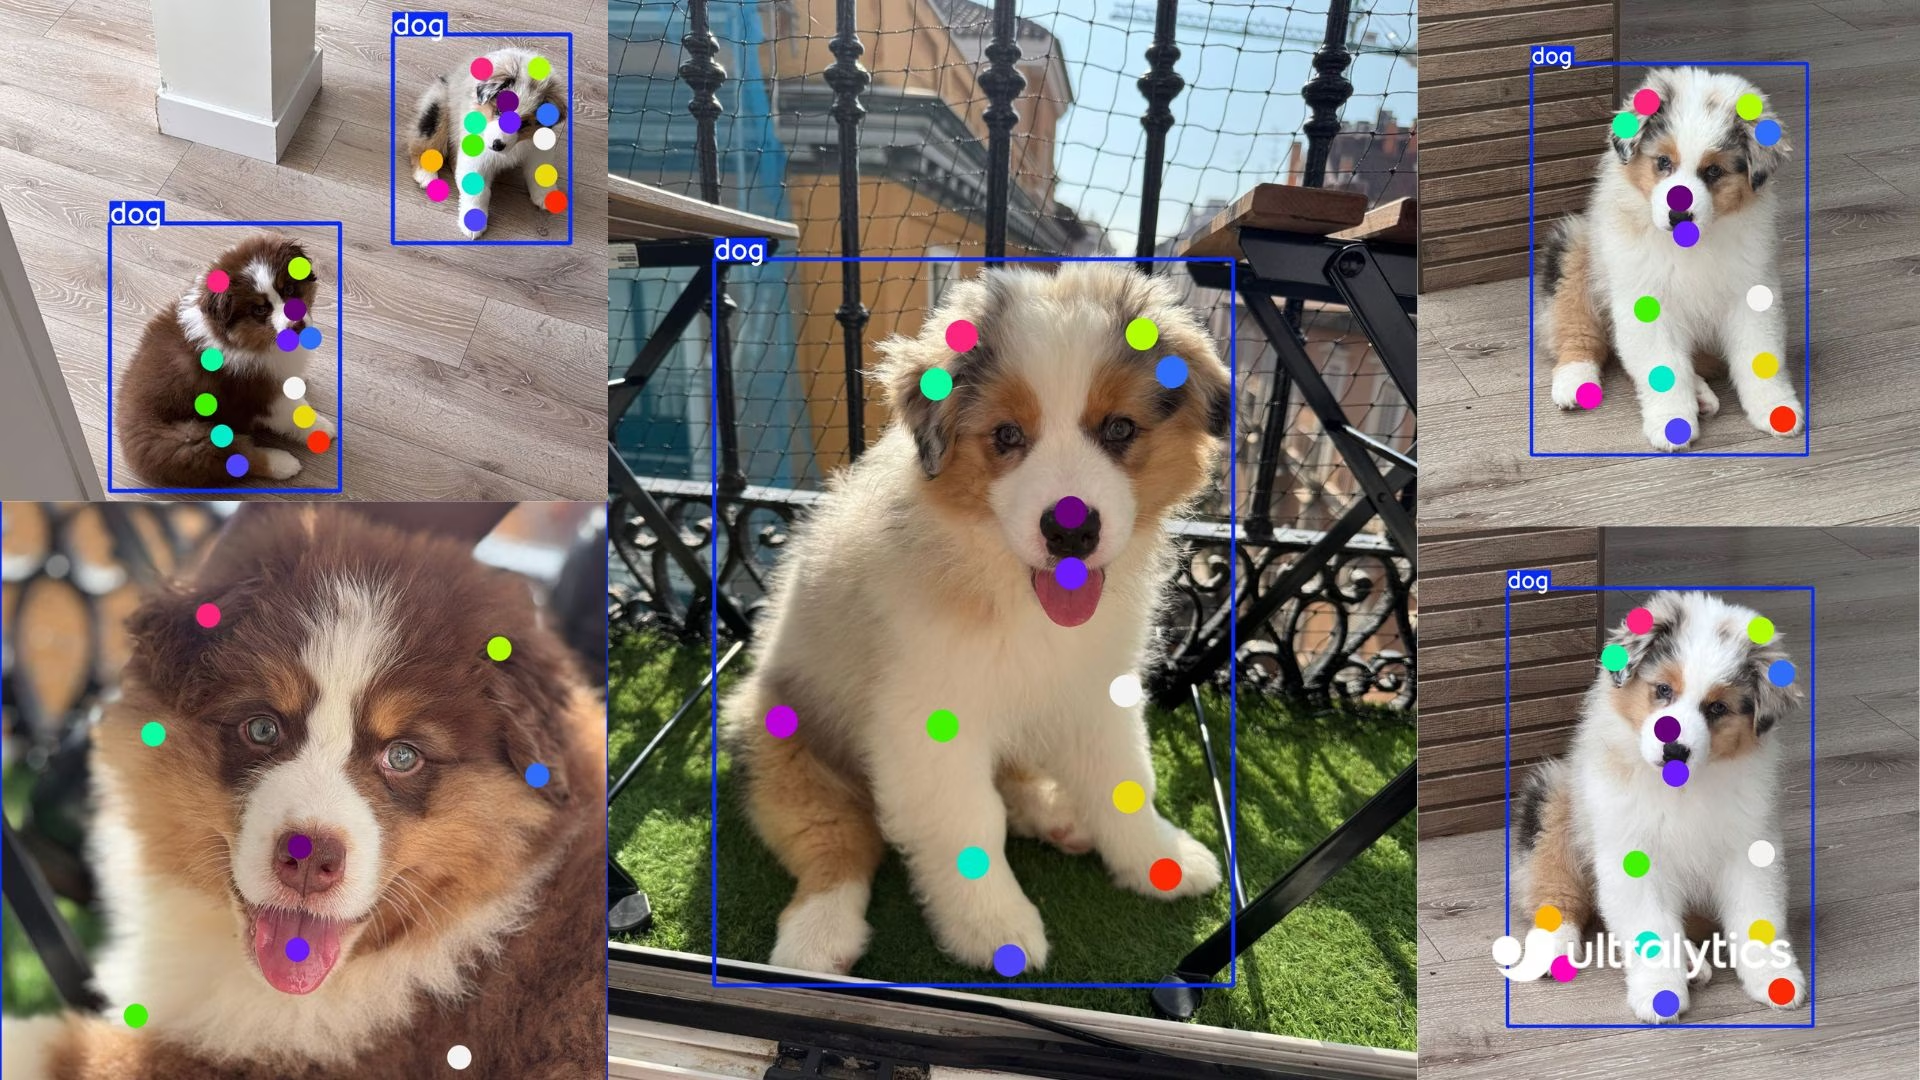
Write the dataset YAML#
path: forklift-pose
train: images/train
val: images/val

kpt_shape: [4, 3] # 4 keypoints, each x, y, visibility
flip_idx: [1, 0, 2, 3] # fork tips swap, mast points stay
kpt_oks_sigmas: [0.05, 0.05, 0.08, 0.08] # tips are sharp, mast ends are fuzzier

names:
  0: forklift

kpt_names:
  0:
    - left_fork_tip
    - right_fork_tip
    - mast_top
- mast_basekpt_namesdocuments the order for people and tools, per class.flip_idxmust undo itself: applying it twice returns every index to itself.kpt_oks_sigmasis optional and weights both the keypoint loss in training and OKS in validation; if present, it must hold one positive value per keypoint or the run stops with aValueError.
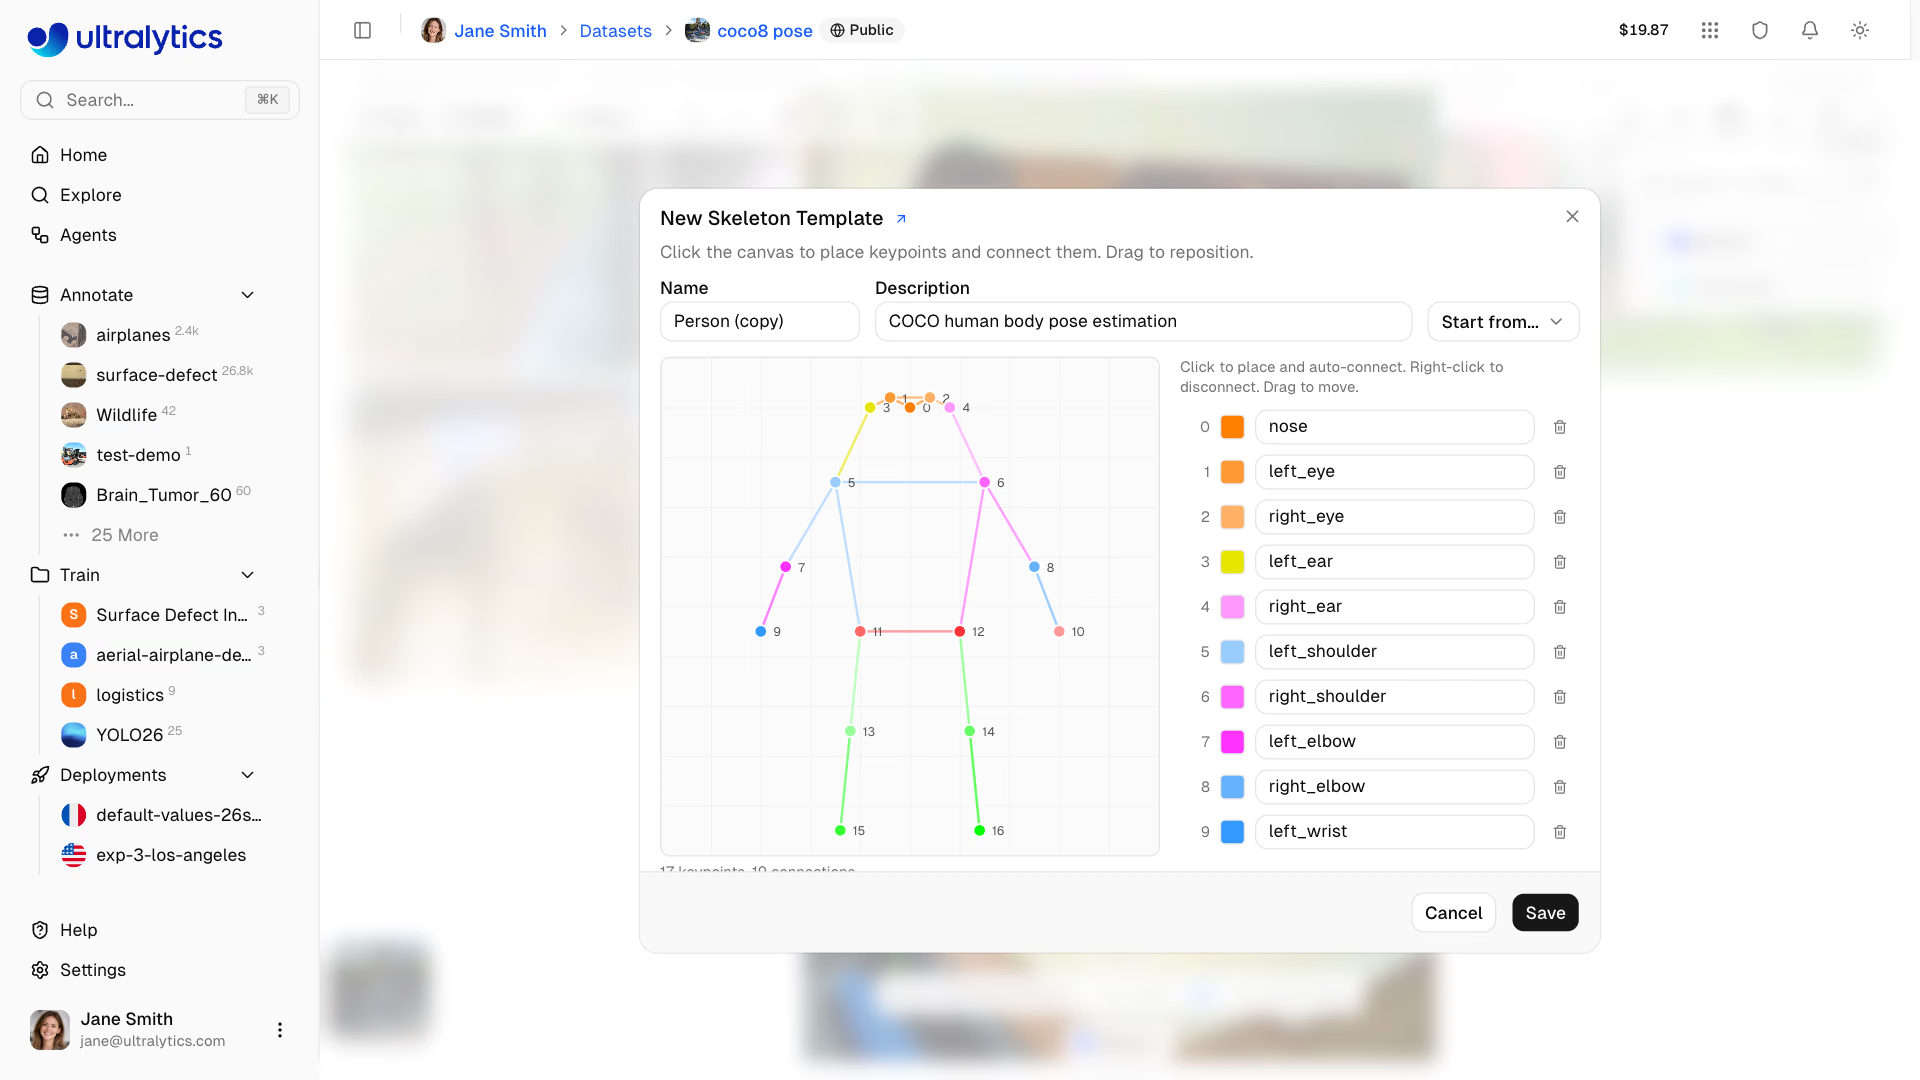
On Ultralytics Platform, the same schema is a skeleton template. A new template can start from an existing one (Start from…), so you rename and trim points instead of placing every keypoint by hand — keep the index order from your schema table:
Check labels before training#
Pose datasets fail quietly: a row missing one keypoint shifts every later value, and a visibility of 3 from a buggy exporter is read as a number like any other. This checker loads the YAML through Ultralytics' own loader and validates every row. It runs as-is on COCO8-pose; swap in your YAML path:
from pathlib import Path

from ultralytics.data.utils import check_det_dataset

data = check_det_dataset("coco8-pose.yaml")  # resolves paths, downloads if needed
k, dims = data["kpt_shape"]
flip = data.get("flip_idx", [])
assert not flip or sorted(flip) == list(range(k)), "flip_idx must list every keypoint index once"
assert all(flip[flip[i]] == i for i in range(len(flip))), "flip_idx must undo itself: pairs swap, center points stay"

expected = 5 + k * dims  # class + 4 box values + k keypoints of `dims` values
bad = 0
for label in Path(data["path"], "labels").rglob("*.txt"):
    for n, row in enumerate(label.read_text().splitlines(), 1):
        values = row.split()
        if len(values) != expected:
            bad += 1
            print(f"{label.name}:{n} has {len(values)} values, expected {expected}")
        elif dims == 3 and not {float(v) for v in values[7::3]} <= {0, 1, 2}:
            bad += 1
            print(f"{label.name}:{n} has a visibility flag outside 0/1/2")
print(f"kpt_shape={data['kpt_shape']}, flip_idx ok, {bad} bad rows")
kpt_shape=[17, 3], flip_idx ok, 0 bad rowsvalues[7::3] starts at the first visibility flag (class, four box values, then x y v) and takes every third value after it.
How OKS scores a keypoint#
Pose mAP replaces box IoU with Object Keypoint Similarity (OKS). For each labeled keypoint, OKS turns the pixel distance between prediction and label into a score from 0 to 1, scaled by the object's size and by that keypoint's sigma, then averages over the labeled keypoints. Pose mAP50-95 averages precision at OKS thresholds from 0.50 to 0.95, exactly like box mAP over IoU thresholds; the performance metrics guide covers the shared machinery.
Sigmas are easiest to understand by measuring them. This script scores the same forklift prediction with two sigmas, using the kpt_iou function the pose validator calls:
import torch

from ultralytics.utils.metrics import kpt_iou

# One labeled forklift, 4 keypoints (x, y, visibility) in pixels, inside a 200 x 120 px box
label = torch.tensor([[[40.0, 30, 2], [40, 90, 2], [170, 20, 2], [170, 100, 2]]])
area = torch.tensor([200 * 120 * 0.53])  # Ultralytics scales box area by 0.53 to approximate object area

for offset in (2, 5, 10, 20):
    pred = label.clone()
    pred[..., 0] += offset  # every predicted keypoint lands `offset` pixels to the right
    sharp = kpt_iou(label, pred, area, sigma=[0.025] * 4).item()
    loose = kpt_iou(label, pred, area, sigma=[0.10] * 4).item()
    print(f"{offset:2d} px off: OKS {sharp:.2f} with sigma 0.025, {loose:.2f} with sigma 0.10")
2 px off: OKS 0.94 with sigma 0.025, 1.00 with sigma 0.10
5 px off: OKS 0.67 with sigma 0.025, 0.98 with sigma 0.10
10 px off: OKS 0.21 with sigma 0.025, 0.91 with sigma 0.10
20 px off: OKS 0.00 with sigma 0.025, 0.67 with sigma 0.10On a 200 × 120-pixel forklift, a prediction 10 pixels off fails the 0.50 OKS threshold with sigma 0.025 and passes every threshold up to 0.90 with sigma 0.10. Same model, same error, very different pose mAP.
| Sigma | Effect | Use for |
|---|---|---|
| Small (≈ 0.025–0.05) | a few pixels off already costs score | sharp points: eyes, fork tips, corners |
| Large (≈ 0.08–0.10) | generous tolerance | fuzzy points: hips, the middle of a mast |
| Default | COCO sigmas for kpt_shape: [17, 3]; otherwise 1/K for every point | start here, then measure |
Sigmas should reflect how consistently annotators place each point. Measure it: have two people label the same 50 images and compare per-keypoint distances. Points they disagree on deserve larger sigmas; otherwise the metric punishes the model for human noise.
Changing kpt_oks_sigmas changes pose mAP without changing the model, as the table above shows. Fix sigmas before your first baseline, record them with every result, and never compare runs validated with different values.
Show solution
Example for a parcel on a conveyor, viewed from above, where the question is "is the label face up, and which way is it rotated?":
| Index | Keypoint | Purpose | Mirror partner | Sigma |
|---|---|---|---|---|
| 0 | label_top_left | label orientation | 1 | 0.04 |
| 1 | label_top_right | label orientation | 0 | 0.04 |
| 2 | label_bottom_right | label orientation | 3 | 0.04 |
| 3 | label_bottom_left | label orientation | 2 | 0.04 |
kpt_shape: [4, 3]
flip_idx: [1, 0, 3, 2]
kpt_oks_sigmas: [0.04, 0.04, 0.04, 0.04]
flip_idx passes the self-inverse check: 0 → 1 → 0 and 2 → 3 → 2. A mirrored label swaps left and right but keeps top and bottom, so top-left pairs with top-right, not with bottom-right.
To find the tolerance, set sigma=[0.04] * 4 in oks.py and extend the offsets; the label's box sets the scale, so use a box the size of a typical parcel label in your images. The offset where OKS first drops below 0.5 is the largest error your annotators' precision allows the model.