Install Ultralytics
Get a working environment in one command — and verify GPU access.
Before we touch a model, we need a Python environment with the ultralytics package installed and ideally a GPU it can talk to. The Ultralytics quickstart covers the whole flow — pip, Conda, or Docker — and this is the most boring lesson in the course and also the one that decides whether everything else works on the first try.
Install Ultralytics in a clean environment and confirm yolo runs end-to-end.
Create a fresh virtual env with Python 3.9+.
pip install ultralytics.yolo checks— read the output, fix anything red.
Hands-on
Link to this sectionPick a Python#
Use a recent Python — 3.9 to 3.12 are well supported. The cleanest setup is a fresh virtual environment so the install doesn't fight your other projects:
python -m venv .venv
source .venv/bin/activate            # Linux/macOS
# .venv\Scripts\activate             # Windows PowerShell

python --version                     # confirm 3.9+
Link to this sectionInstall#
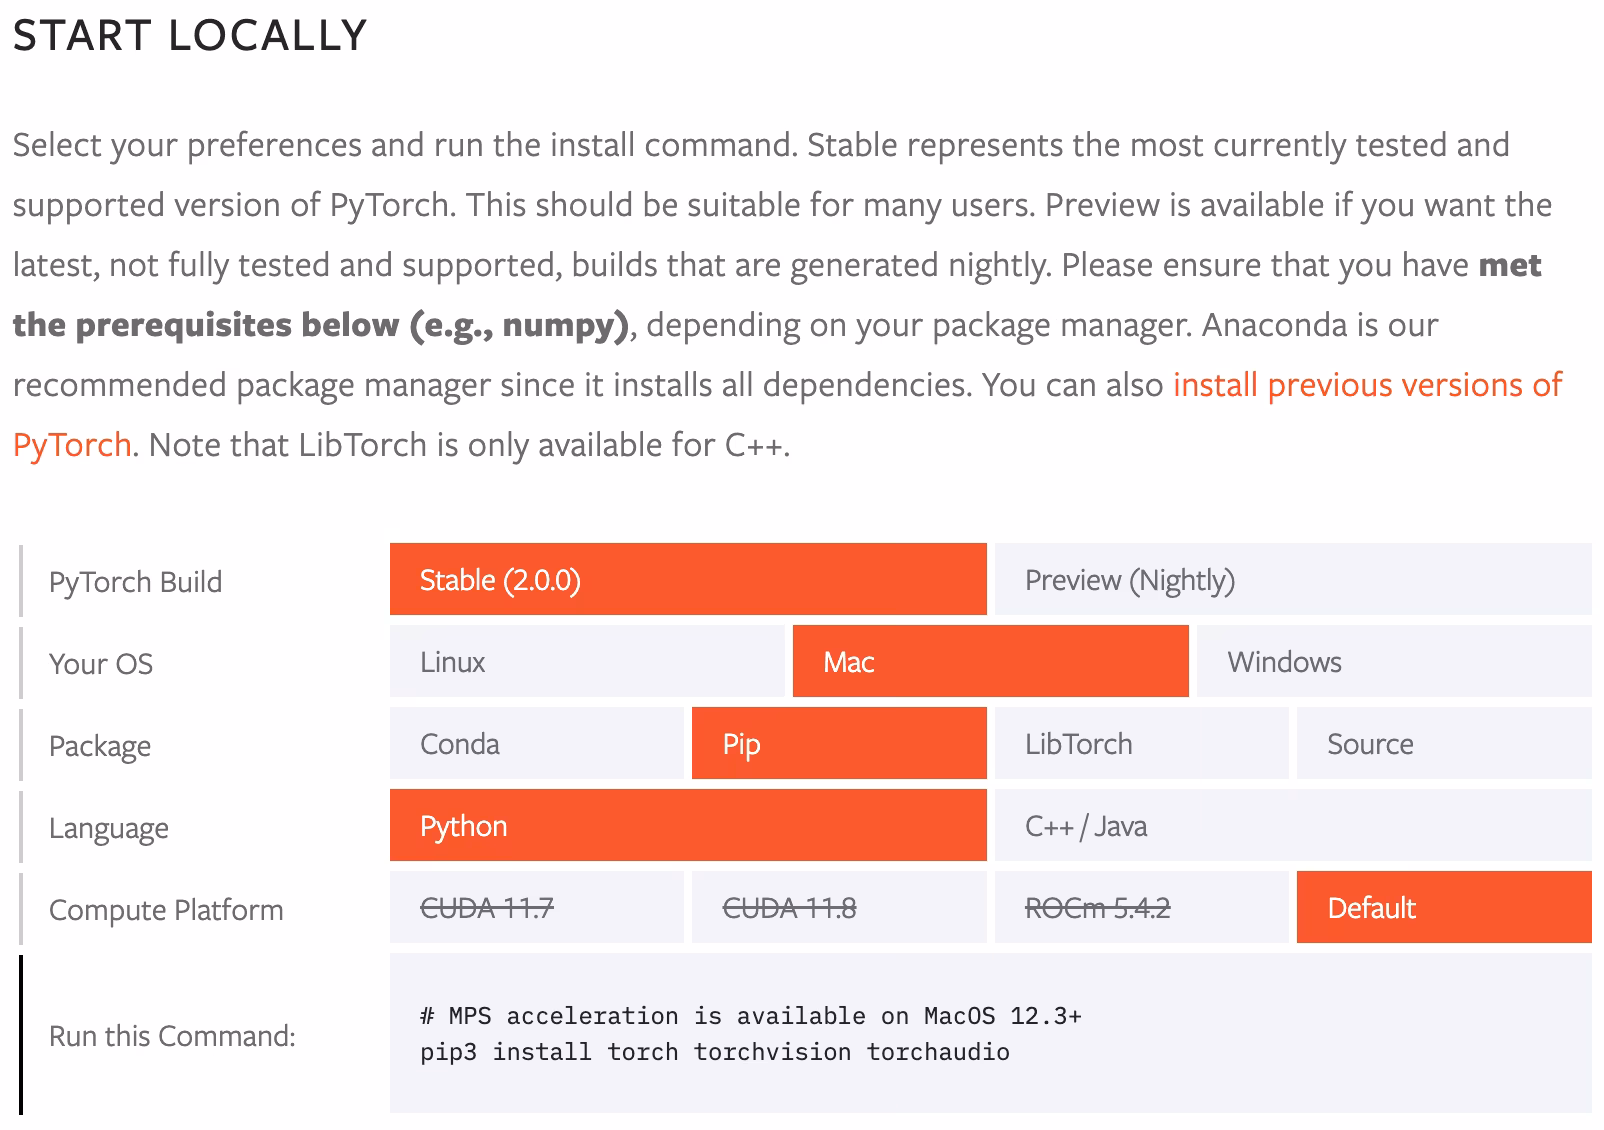
The Ultralytics quickstart starts with the package on PyPI and pulls in PyTorch automatically:
pip install ultralyticsThat installs:
- The
ultralyticsPython package. - The
yolocommand-line tool. - A pinned PyTorch matching your platform.
Training on CPU is fine for tiny experiments but painful for anything real. If you have an NVIDIA GPU, install a CUDA-enabled PyTorch first; pip will then keep the GPU build instead of overwriting it. On Apple Silicon, MPS works out of the box.
Link to this sectionVerify#
The most useful first command after install is the same sanity check covered in the quickstart:
yolo checksIt prints platform, Python version, PyTorch version, CUDA / MPS availability, and the version of ultralytics itself. Any red text is a setup issue you want to fix now, not in lesson 6.
A healthy output looks like this:
Ultralytics 8.x.x 🚀 Python-3.11.7 torch-2.5.0+cu121 CUDA:0 (NVIDIA RTX A4000, 16 GB)
Setup complete ✅ (8 CPUs, 32 GB RAM, 200 GB disk)
If you don't see your GPU, you don't need it for this course — but every epochs=100 will take 10× longer.
Link to this sectionA first prediction#
End the install verification with an actual prediction using the latest YOLO26 nano weights. If this works, the rest of the course works:
yolo predict model=yolo26n.pt source='https://ultralytics.com/images/bus.jpg'You should see a downloaded model, an inference run, and a saved annotated image under runs/detect/predict/. Every default in that command — model, source, confidence, image size — is documented in the configuration reference.
Link to this sectionCommon install gotchas#
| Symptom | Fix |
|---|---|
ImportError: numpy._core.multiarray failed | Reinstall numpy / pin torch and ultralytics together: pip install --upgrade --force-reinstall ultralytics |
| CUDA not detected | Match torch wheel to CUDA: see pytorch.org/get-started and reinstall before ultralytics. |
Permission errors writing runs/ | You're in a read-only dir. cd into your project directory first. |
yolo: command not found | Activate the venv (source .venv/bin/activate). Pip installs into the venv's bin/scripts dir. |
If you hit something exotic, the Ultralytics GitHub repo is the canonical source — search closed issues before opening a new one.
Run yolo checks and yolo predict model=yolo26n.pt source='https://ultralytics.com/images/bus.jpg' end-to-end. Both should complete without errors and the prediction should save an annotated image.
yolo checksruns and the output is healthy (no red errors).yolo predict ...saves an annotated image toruns/detect/predict/.You know whether you're training on GPU, MPS, or CPU.
Show solution
yolo checks
yolo predict model=yolo26n.pt source='https://ultralytics.com/images/bus.jpg'Now that the environment works, let's actually look at what predictions look like in Python.